

Managing Users
What is a user?
A user is a person who has access to your FlowQi workspace. Each user has a name, a username, an email address, a role, the modules they can use, the teams they belong to, and a status. You manage all of this from the Users page in the Admin Console.
You might call them team members, employees, seats, or accounts — in FlowQi a person with access is a user.
Where to find Users
Open the Admin Console from your avatar menu (click your profile picture in the top-right corner, then Admin Console) and go to Users in its left navigation. You’ll see the full list of everyone in your workspace, with filters and a search bar at the top. The Admin Console also holds Teams , Billing , Permissions , and Tenant Setting ; use Back to App to return to the main app.
The users overview
The list shows the following columns per user:
| Column | Content |
|---|---|
| Name | First and last name (click to open the user). A star marks a Super Admin. |
| Username | The user’s @username, if set |
| Module | How many modules the user has access to (for example 2 Modules) |
| Team | How many teams the user belongs to |
| Activation Method | Invited (you invited them) or Self-registered (they signed up themselves) |
| The user’s email address | |
| Role | A dropdown: Super Admin, Team Admin, User, or Guest User. Change it inline. |
| Invite By | Who invited the user |
| Last Active | When the user was last active |
At the top of the list you can:
- Search users — type in the search bar to find a user.
- Filter by Role — show only users with a specific role, or All Roles.
- Filter by Status — Active, Pending, Inactive, Deactivated, Suspended, Rejected, or Archived.
- + Create New User — invite someone new (top right).
Creating (inviting) a user
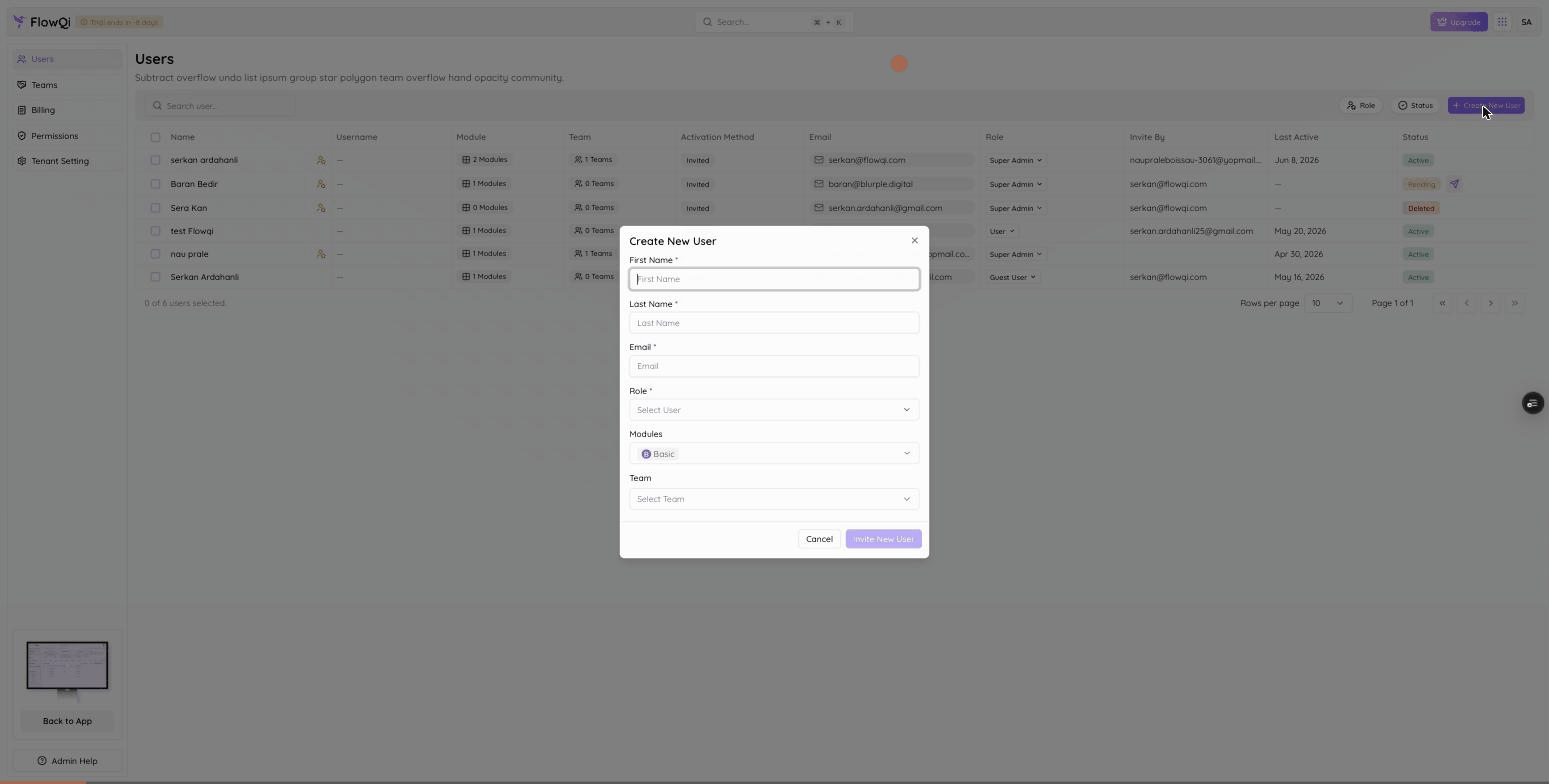
You add a user by inviting them with Create New User. They appear in the list as Invited until they activate their account. Users who signed up on their own show up as Self-registered.
- Click + Create New User (top right).
- Fill in the form. These fields are required:
- First Name
- Last Name
- Email (must be a valid email address)
- Role — Super Admin, Team Admin, User, or Guest User (see Roles )
- Optionally add:
- Modules — the modules the user may access. Modules that are part of your subscription and can’t be removed are always selected.
- Team
- Click Invite New User.
The person receives an email invitation and appears in the list with the status Pending until they accept.
Only the modules you have an active or trial subscription for can be assigned. You need the Create New User permission to see this button.
Resending an invitation
If a user is still Pending, open their profile and click Resend next to their name to send the invitation email again.
Editing a user
- Open a user by clicking their name, or select one user and click Edit.
- The Profile window opens with a side menu:
- User Details — First Name, Last Name, Job Title, and Role
- Security — multi-factor authentication status and MFA recovery
- Teams — the teams this user belongs to
- Change what you need and save your changes.
Changed fields are highlighted so you can see what you’ve edited before saving.
Roles
Every user has one Role, which sets their account-level permissions — what they can see and do across the workspace. FlowQi has four roles:
| Role | Typical use |
|---|---|
| Super Admin | Full control, including the Admin Console, billing, and permissions |
| Team Admin | Manages their team’s users and work |
| User | A regular member who works in the modules they’re given |
| Guest User | Limited, external access |
You can change a user’s role directly in the Role dropdown in the list, or under User Details when editing. What each role can actually do is governed by Permissions .
Your workspace must always keep at least one Super Admin. FlowQi won’t let you change the role of the last Super Admin or remove their status.
Teams and modules
- Teams — assign a user to a team when you invite them, and review their teams under the Teams section of their profile. The Team column shows how many teams each user belongs to.
- Modules — the modules a user can access are set when you invite them. The Module column shows how many modules each user currently has (for example 2 Modules).
Security and MFA
Under the Security section you can see whether a user has multi-factor authentication enabled. This is read-only in the admin console — users manage MFA from their own profile.
If a user loses access to their authenticator, they can request MFA recovery. A pending request shows a warning icon next to the user’s name. Open the user, go to Security, and click Approve to let them re-enroll.
Status: active, pending, inactive, and more
A user’s Status reflects where they are in their lifecycle:
| Status | Meaning |
|---|---|
| Active | Has full access |
| Pending | Invited but hasn’t accepted yet |
| Inactive / Deactivated | Temporarily without access |
| Suspended | Access blocked |
| Rejected | Invitation declined |
| Archived | Removed from active use; data is kept |
Activating and deactivating
Select a user and use Activate or Deactivate in the action bar at the bottom to switch their access on or off.
Archiving a user
Select a user and click Archive in the action bar. An Archive user window opens with an impact summary showing how many projects, tasks, subtasks, and organizations the user owns.
- If the user owns projects, you must choose a new project owner before continuing.
- Optionally pick another user and transfer their tasks and subtasks and/or organizations.
Archived users lose access, but their team and module assignments are kept. Use Restore to bring them back with their previous assignments.
Not sure whether to remove someone permanently? Archive them instead — all their data is preserved and they can be restored later.
Deleting a user
Select a user and click Delete in the action bar. The Delete user window shows the same impact summary and transfer options as archiving, plus a timing choice:
- Delete now — remove the user immediately.
- Schedule deletion — pick a date and time for the deletion to run.
If a deletion is already scheduled, you can still delete immediately, but you can’t schedule a second one.
Deleting is permanent. If you don’t transfer a user’s tasks, they become unassigned. When in doubt, archive instead of delete.
Permissions
What you can do on the Users page depends on your role. There are separate permissions for viewing, inviting, updating, and deleting users, and view/update/delete can apply to all users, only your own, or your team’s. If you don’t see a button (for example + Create New User), you’re missing the matching permission — ask a Super Admin or administrator. See Permissions for the full picture.